Resource for understanding:
- https://blog.bytebytego.com/p/password-session-cookie-token-jwt
- https://blog.bytebytego.com/p/password-session-cookie-token-jwt-ec1
Authentication and Authorization
- One of the most important topics to understand.
- We will see the different ways to achieve this and which one among them is more secure.
Authentication: Who are you? (Your identity)
Authorization: What can you do? Which resources are accessible to you? (Permissions)
Authentication
- On a general level, authentication is of 3 types:
- Knowledge based (what you know): passwords, PIN, security questions
- Possession based (what you own): device / phone, physical keys
- Something unique to you: biometric, retina scan, facial recognition, DNA
- Multi-factor authentication
User -> Factor 1 + Factor 2 + ... -> System- Generally involves multiple authentication steps before accessing a system
- Password + SMS (OTP)
- Password + authenticator app
- Biometric + PIN
Password-less Authentication
- We all know password authentication and we have seen it everywhere while logging into websites. Generally it is not used as a standalone approach and is often combined with
MFA, like in GitHub. - The problem with password authentication is that if
MFAis not enabled it is very easy to breach when the password is leaked.
Password-less:
- Here we have things like:
- Magic Link: email / SMS with login links
- Biometrics: face / eye detection
- OTP through email / phone
How do OTP and Magic Link work with MFA?
The whole point of OTP is to leverage something you have (phoneNumber) and something you own (device) for authentication. This removes the dependency on passwords.
Here phone serves as a kind of identity.
Things to note:
- Only OTP-based authentication involves servers storing OTP vs identifier data in a persistence store like
redis, making the serverstateful. - These things have to be stored in a centralized database so that all servers can access them and they remain safe under crashes and server restarts.
- SMS-based OTP delivery is not very safe because SMS OTPs can be intercepted.
- Generally used in WhatsApp, Uber, magic link systems, and banking apps.
- It is widely used with
MFA, combining password and OTP support to increase security.
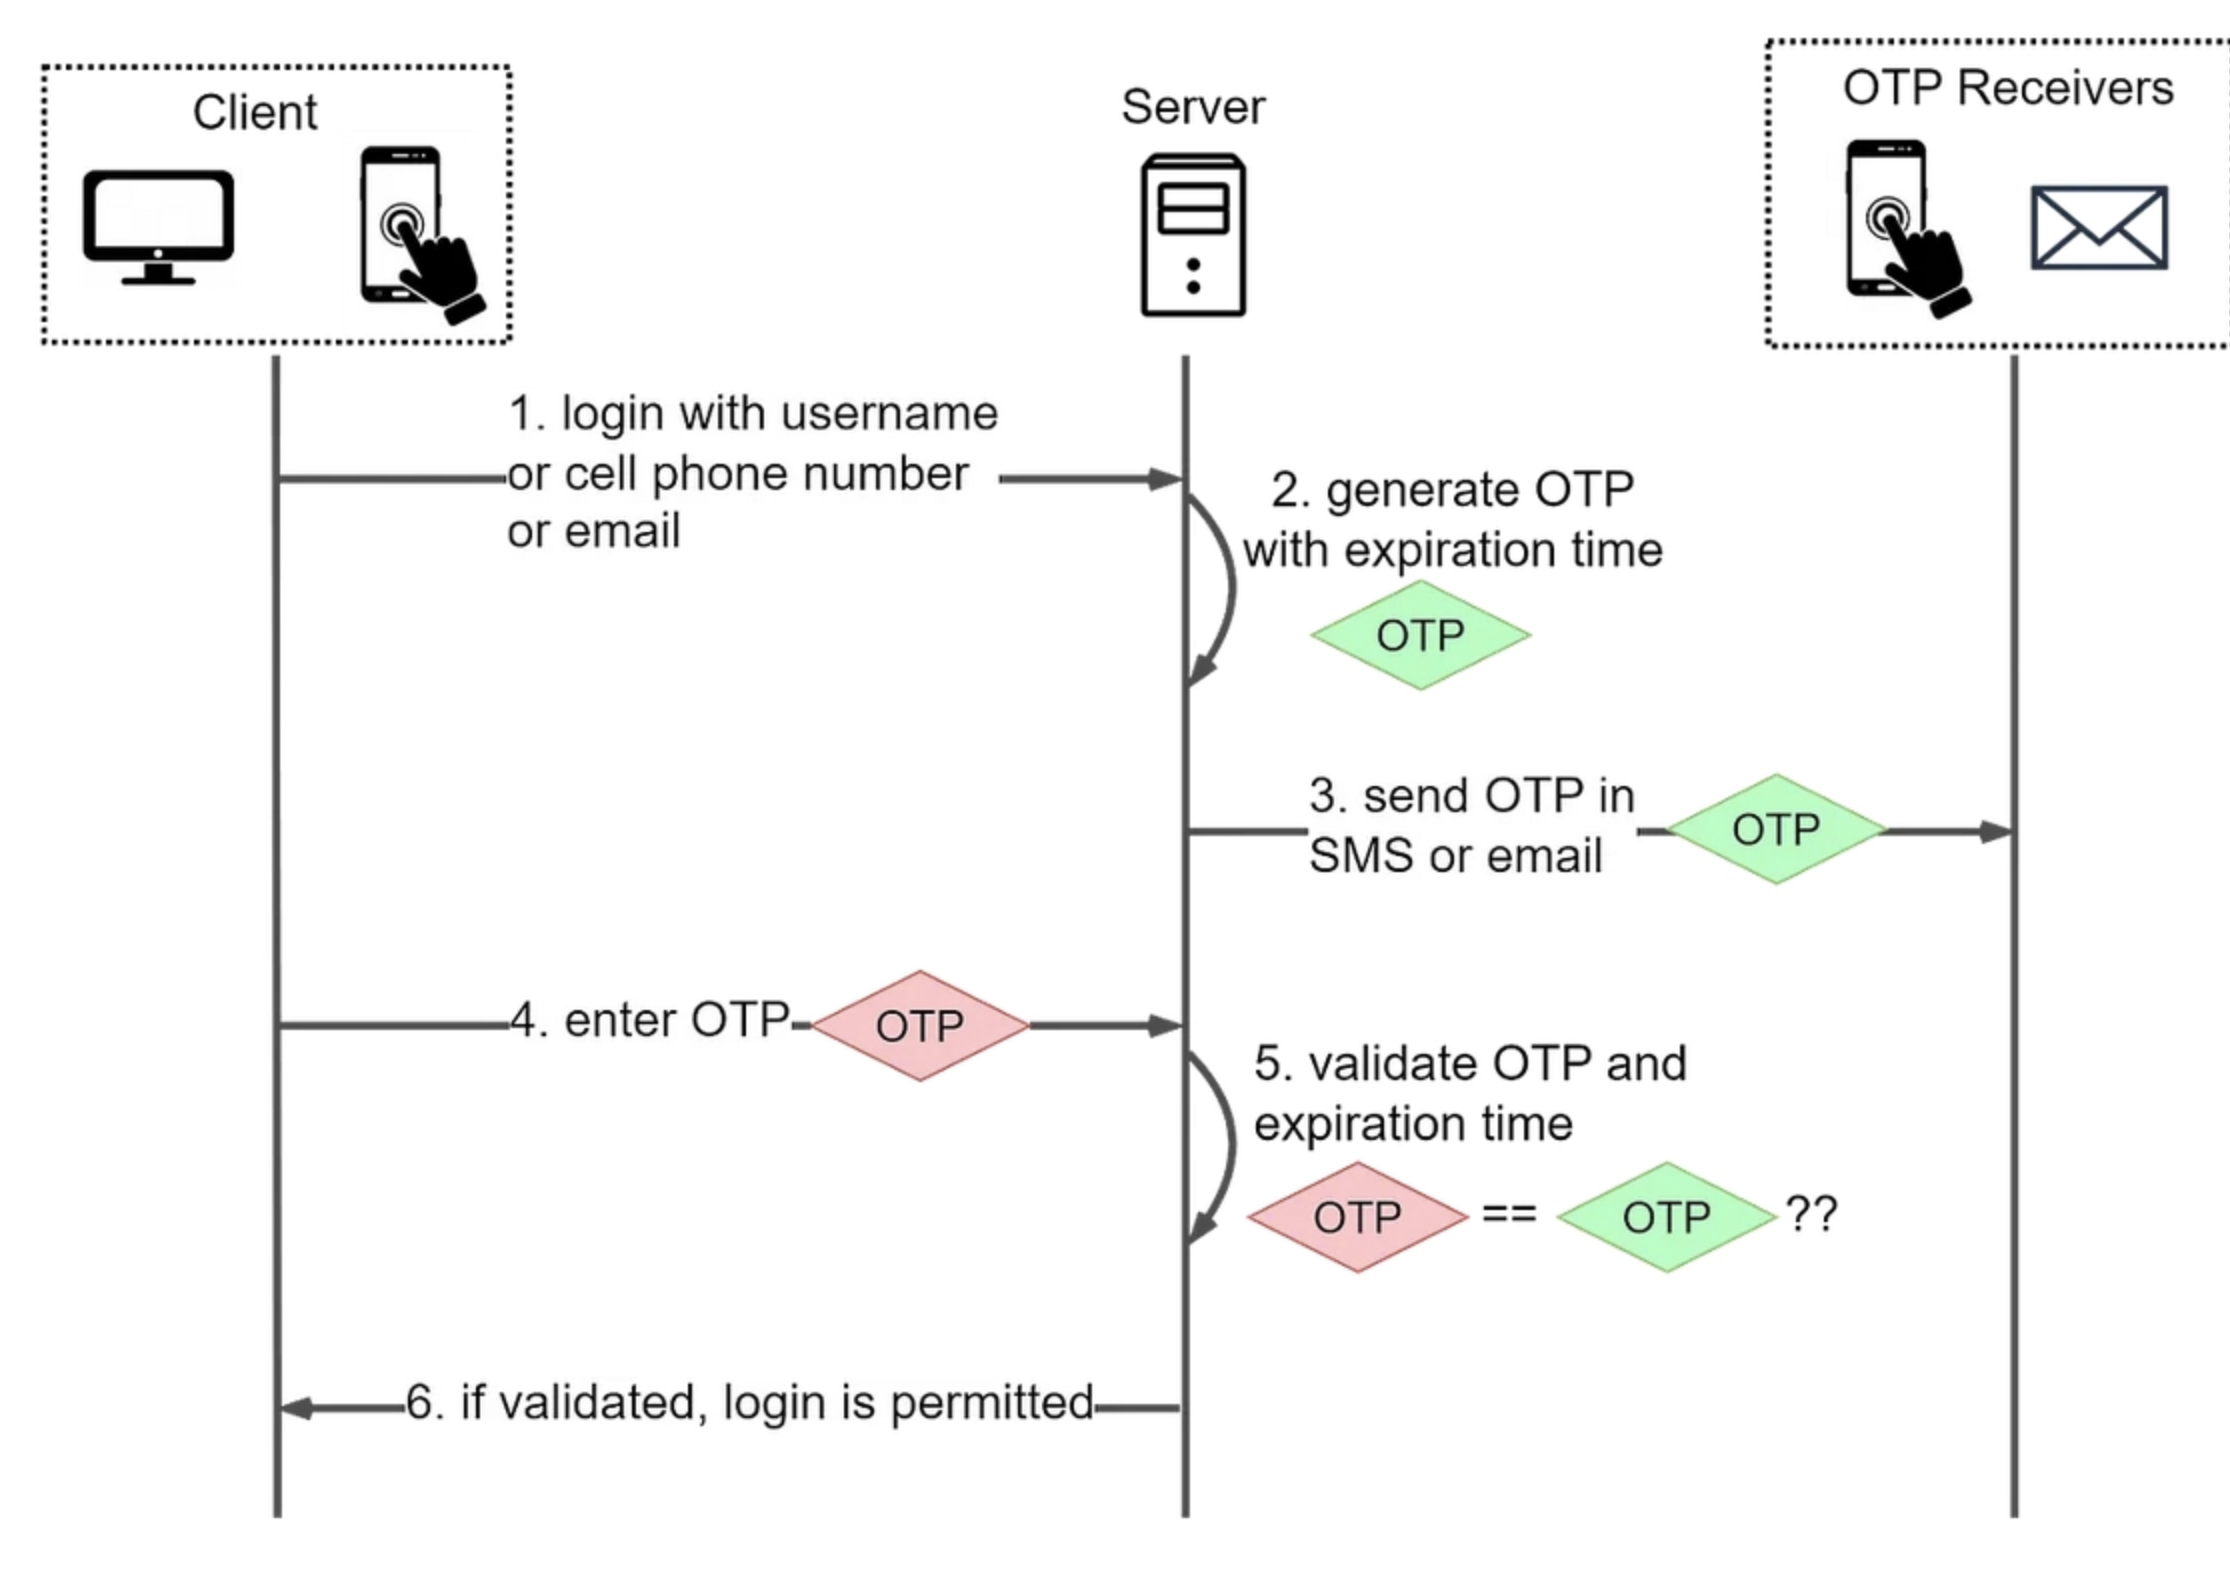
1. User enters username / email / phoneNumber
2. Server generates random OTP (123456)
3. Server stores in database (centralized)
   { phone: "+1234567890", otp: "123456", expires: timestamp }
4. Server sends OTP via SMS / email
5. User submits OTP
6. Server validates the incoming OTP with the database
7. Server deletes OTP (one-time use)
8. Server then finds the user with that phone -> then creates a session token
Stateless OTP
- In the above implementation we saw how OTPs are stateful and servers have to store OTPs in a centralized persistence store. This makes OTP dependent on the database. So if the authentication database is down, the whole login flow is hijacked.
How can we make it stateless?
- First thing that comes to mind is that the user can log in with anyone's phone / email, so we cannot just pass tokens to the user blindly.
- The idea is similar to
JWT: instead of sending a short OTP only, you send a signed token to the identifier (phone / email).- The identifier contains a
payloadwhich includes the samephoneNumberalong withexpiry, so you can verify it on receiving the token.
- The identifier contains a
The problem with this approach is the received hash is long and users prefer a 4 or 6 digit OTP instead. Security vs user experience.
// Generate OTP with embedded metadata
function generateOTP(phone) {
    const otp = randomCode();
    const payload = {
        phone,
        otp: hash(otp), // don't store plain OTP
        exp: Date.now() + 300000
    };
    const token = jwt.sign(payload, SECRET);

    // Send OTP to user, return token for verification
    return { otp, verificationToken: token };
}

function verifyOTP(phone, inputOTP, verificationToken) {
    const payload = jwt.verify(verificationToken, SECRET);

    if (payload.exp < Date.now()) return false;
    if (payload.phone !== phone) return false;
    if (!verifyHash(inputOTP, payload.otp)) return false;

    return true; // Valid!
}
TOTP: Google / Authy [Time-based OTP] / OTPless
- Server does not store the OTP. On verification the server generates OTP at runtime.
- The idea is that the server will never store your OTP in the database. It computes what the expected OTP should be based on your identifier info (
userName) and currenttimeWindow, then matches the incoming OTP with the expected OTP.
----- USER FLOW -----
1. You are at www.ontic.com and want to login
2. You enter your userName only
3. Server asks you to input your password from Authy
4. You see a 30 sec password on Authy and input that
5. Boom, you're logged in and a JWT token is generated and set into your cookie
6. Every further request is authenticated for some time

---- AUTHY FLOW (One-time setup) ----
1. You install an Authy app based on your username and password / OTP
// (This code changes every 30 seconds)
2. Authy app shows "123456" for "Example.com - john"
3. Does the server store this OTP every 30 secs?
Ans.: NO

In the backend:
-> Server generates SECRET KEY during TOTP setup (one-time), not every login
-> Server stores: { userID: "123", totpSecret: "ABC123XYZ" }

--> Now when the user is logging in using an OTP ("123456")

--- Server Side Verification ---

verify(incomingCode) {

final User user = db.findUser("username");
final String storedSecret = user.getTOTPSecret();

final String expectedCode = calculateTOTP(storedSecret, getCurrentTimeWindow());
if (incomingCode == expectedCode)
    createSession(user)
else
    response.send(401);
}
------
Magic Link
- Another password-less authentication approach.
- Basically in the token you embed user authentication info and send that token to the user email (
device / what user owns). https://yourapp.com/auth/verify?token=eyJhbGciOiJIUzI1NiIsInR5cCI6IkpXVCJ9...- The link is kind of a
JWT tokenwhere if you click on the link the server verifies you based on the token. This token has embedded information likeuserIdetc.
1. User goes to login page
2. User enters email address (no password)
3. Server generates unique, time-limited link
4. Server emails link to user
5. User clicks link -> instantly logged in
6. Server validates link -> creates session- Here also there are 2 approaches:
- Either server stores this token and verifies against the database when the token arrives. Stateful.
- Use
JWTin the actual token.- First server verifies if the incoming email belongs to a user.
- Then it creates a magic link and sends it to that email.
// create JWT
const payload = {
    userId: user.id,
    email: userEmail,
    purpose: "magic_link", // Security: specify purpose
    exp: Math.floor(Date.now() / 1000) + (15 * 60), // 15 minutes
    iat: Math.floor(Date.now() / 1000) // issued at
};

function createJWT(payload) {
    const header = {
        alg: "HS256",
        typ: "JWT"
    };
    const encodedHeader = base64urlEncode(JSON.stringify(header));
    const encodedPayload = base64urlEncode(JSON.stringify(payload));
    const signature = sign(
        encodedHeader + "." + encodedPayload,
        SERVER_SECRET
    );
    return encodedHeader + "." + encodedPayload + "." + signature;
}

// verify JWT and login directly
function verifyJWT(incomingToken) {
    const [header, payload, signature] = incomingToken.split(".");

    // Recreate signature using only token data
    const expectedSignature = sign(
        header + "." + payload,
        SERVER_SECRET // Only external dependency
    );

    return signature === expectedSignature;
}
MFA
Email / SMS based MFA (Stateful)
1. User enters username + password
2. Server validates credentials
3. Server generates random OTP (123456)
4. Server stores OTP temporarily (stateful)
5. Server sends OTP to user's phone / email
6. User enters OTP from phone / email
7. Server compares entered OTP with stored OTP
8. If match -> create session JWT
Authentication Mechanism
This usually comes once authentication is done. Here we discuss how to manage tokens once authentication is done.
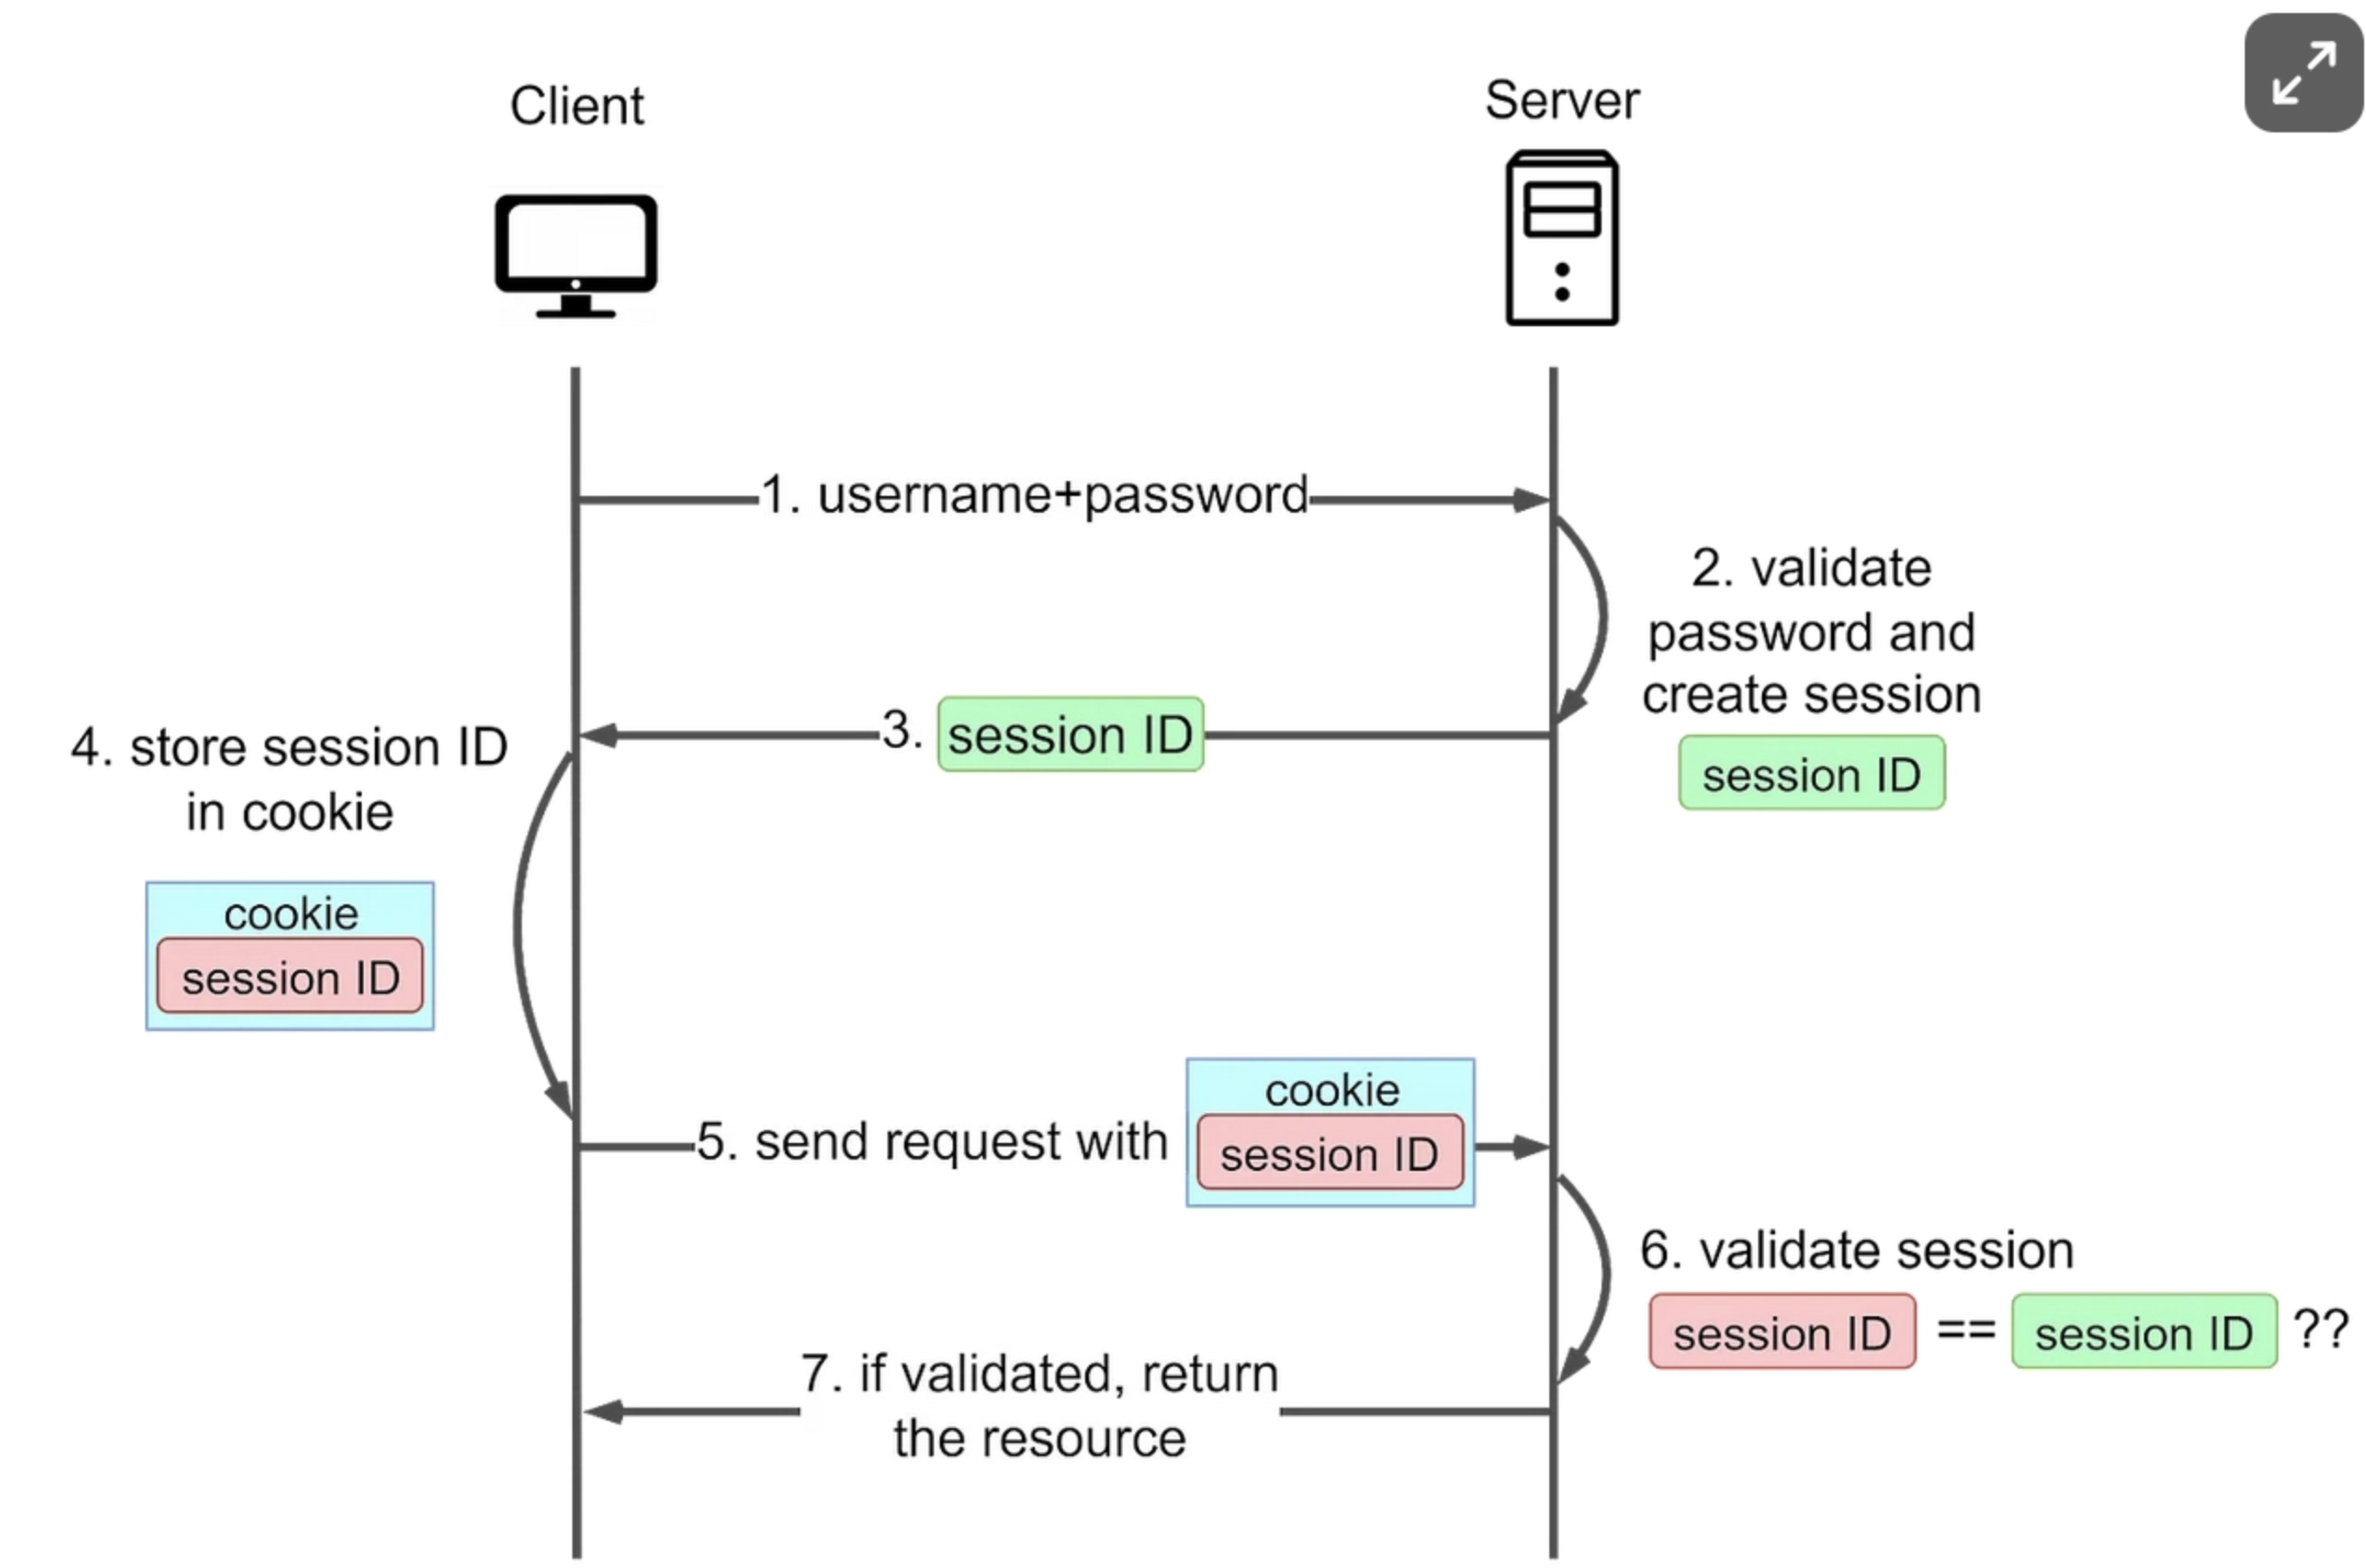
- Session Based
- JWT
- In order to understand
JWTyou should know the difference betweenstatelessandstatefulauthentication and what problemJWTsolves over session-based authentication.
- In order to understand
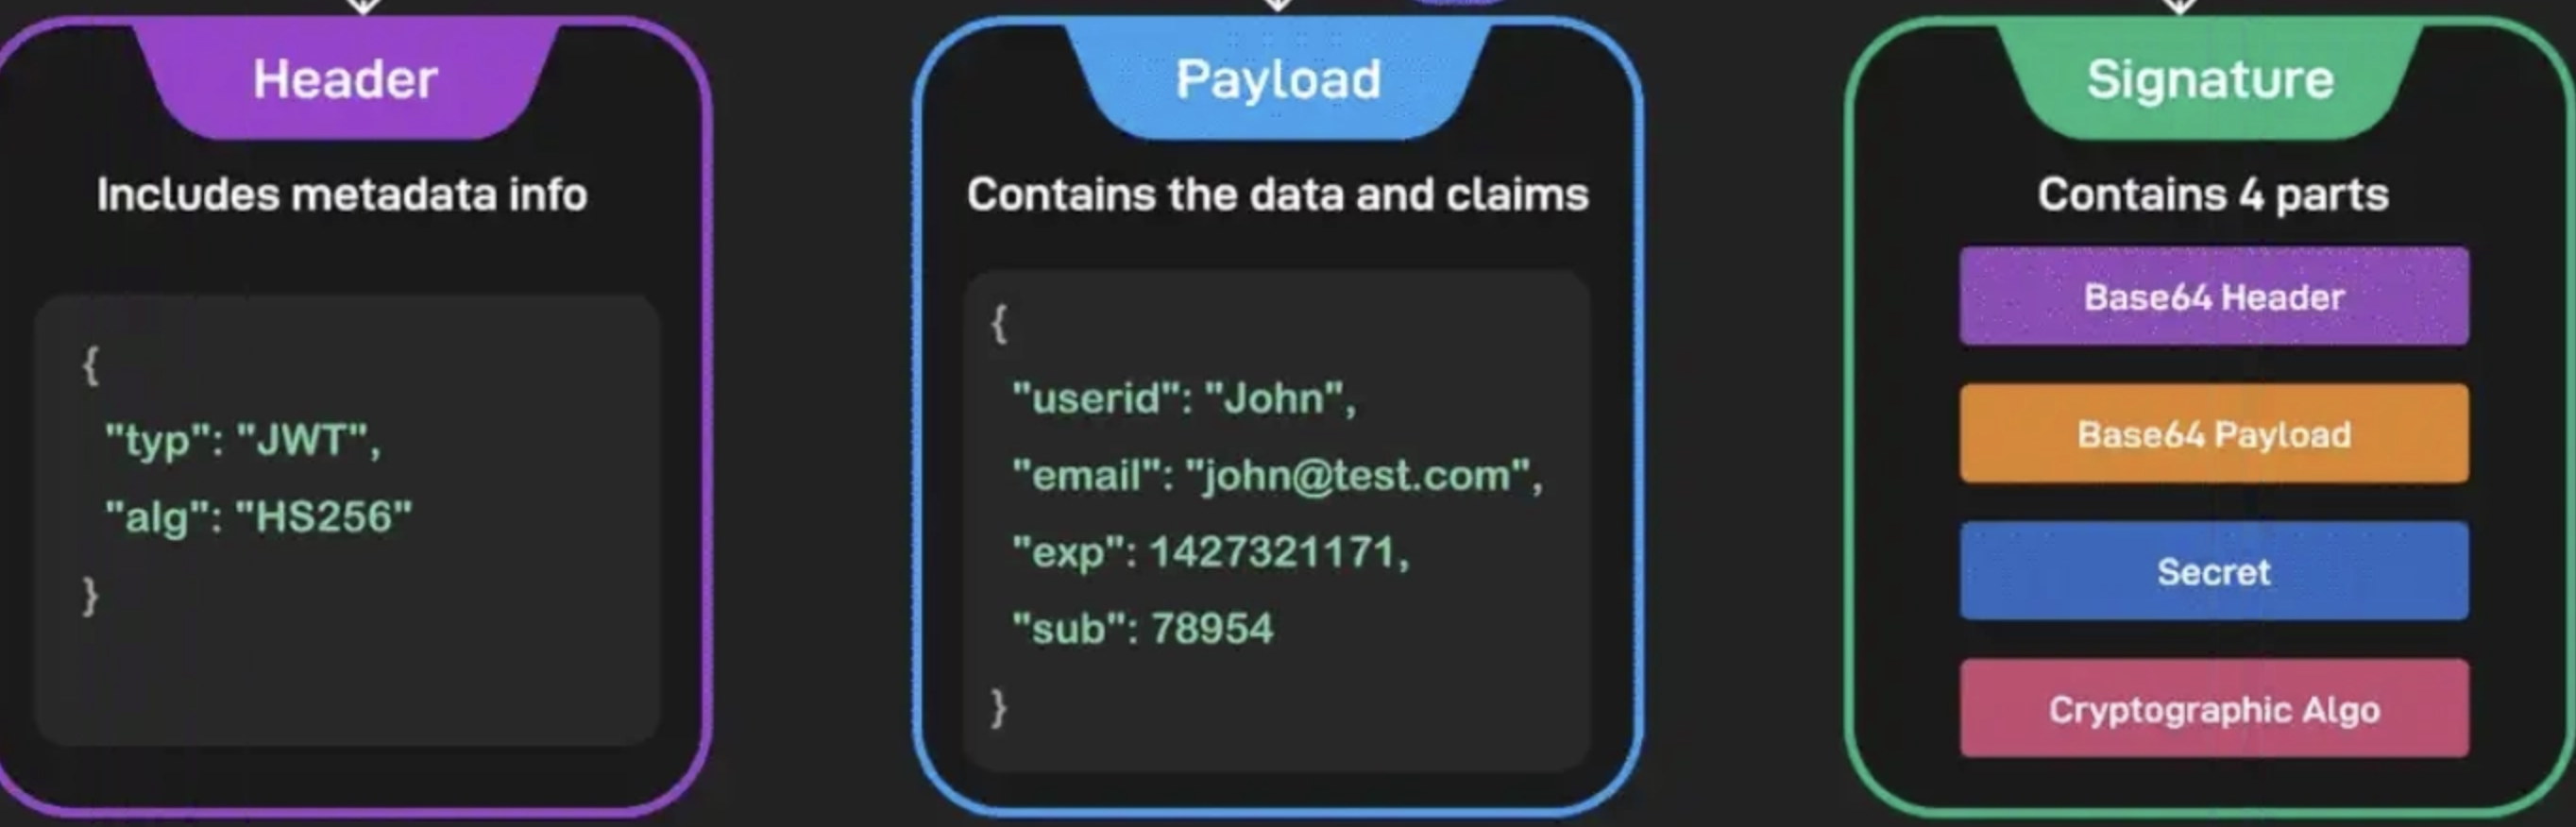
- JWT is a token made of 3 things:
header.payload.signature- Header: contains the algorithm used for signing JWT
- Payload (
claims): contains actual metadata about the user like:userId,userName,role- These are the things the server used to store earlier in session-based authentication.
- This is the thing that makes
JWTstateless.
- Signature:
cryptographic proof- This makes
JWTsecure. It takes the encoded header, encoded payload, secret key, and the algorithm.
- This makes
The whole point of signature is to prove that the exact bits
header + payloadhaven't been tampered with. That is why during signature computation we take header and payload as parameters to compute the signature.
const signingInput = base64urlEncode(header) + "." +
                     base64urlEncode(payload)

signature = Sign(signingInput, secretOrPrivateKey)
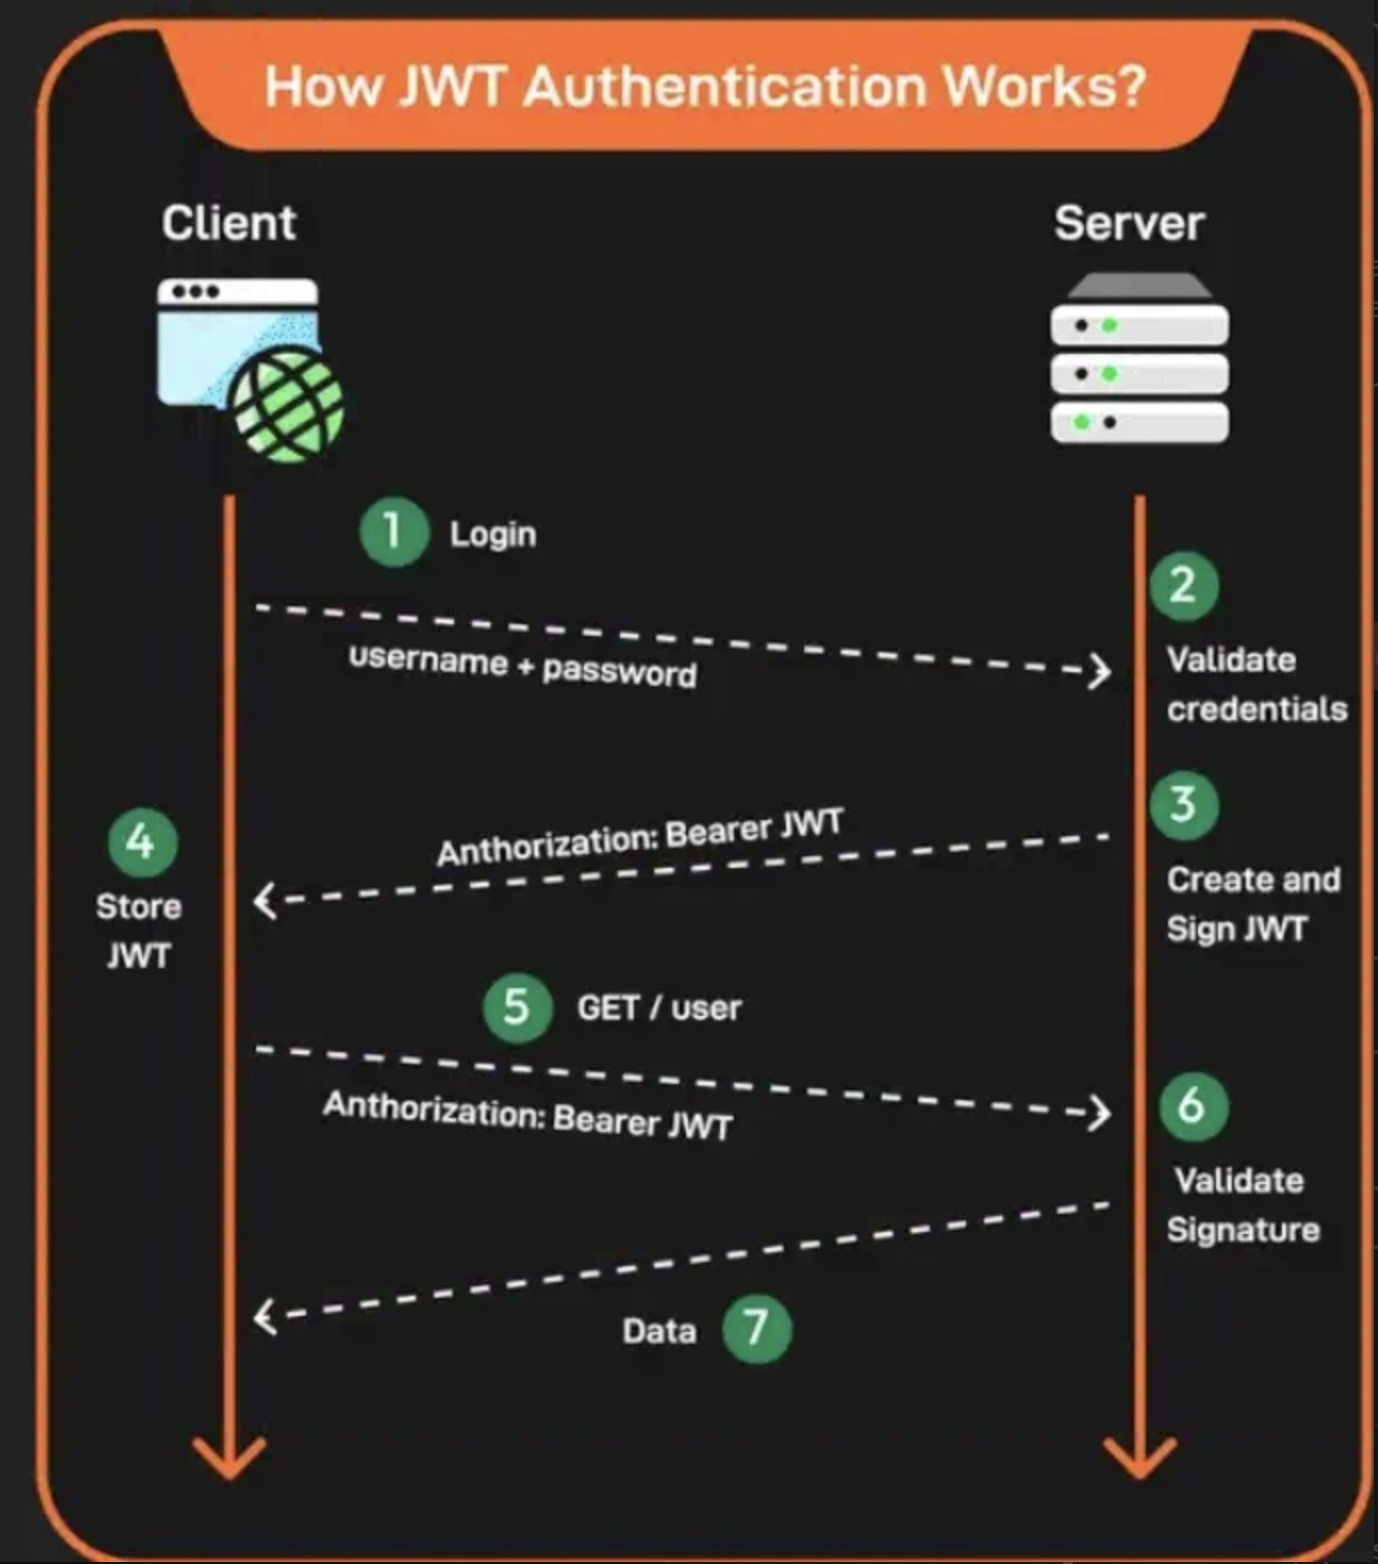
Workflow
1. POST /login { username, password }
2. Server validates -> creates JWT token
3. Response: { token: "eyJ...", expires: "..." }
4. Client stores token
5. Future requests: Authorization: Bearer eyJ...
6. Server validates JWT on each request

-> During validation server first recomputes the local signature from the
   payload and header received in the token

// for symmetric key algorithms
function verifyJWT(incomingToken) {
    const [header, payload, signature] = incomingToken.split(".");

    // Recreate signature using only token data
    const expectedSignature = sign(
        header + "." + payload,
        SERVER_SECRET // Only external dependency
    );

    return signature === expectedSignature;
}

// Sign algorithm
function sign(input, secret) {
  return crypto
    .createHmac("sha256", secret)   // HMAC with SHA256 algorithm
    .update(input)                  // data = header + "." + payload
    .digest("base64url");           // base64url encoding (JWT standard)
}- So for a symmetric key algorithm all the servers must have this
secretkey in order to verify the token.
Verify Function for Asymmetric Key Algorithm
// Here we don't recompute the signature again on the verification side as we
// only have public keys, so we can only verify

function verifyJWT(incomingToken) {
    const [header, payload, signatureB64] = incomingToken.split(".");

    const signature = Buffer.from(signatureB64, "base64url");
    const verifier = crypto.createVerify("RSA-SHA256");

    return verifier.verify(SERVER_PUBLIC_KEY, signature);
}
How does server sign the token?
- Symmetric signature
- A single key is used for signing and verifying the token. So that same key must be shared across multiple servers.
- Asymmetric signatures
- This generally includes
RSAwhere a private key is used for signing and public keys are used for verifying the token. - Generally private keys are stored in one
Auth Serverand public keys are shared across servers which have to do verification for users.
- This generally includes
The main problem with JWT is that once compromised the token stays valid until expiry. There is no way to invalidate the token immediately. So if you change scopes for a user, older tokens will still carry that scope until expiry. That is why sometimes it is better to persist tokens.
Session vs JWT (Stateless vs Stateful)
- Stateful authentication:
- Why is the session-based approach stateful?
- The session state lives on the server.
- For every
sessionIdgenerated you are keeping information about that user in a separate stateful store like Redis / in-memory. - When you receive a
sessionIdyou have to look up your store to fetch user information to check which user this request belongs to. - The problem here is that if there are 10k connections the server has to store 10k user session records.
- These session states are sticky. If the request goes to another server, that server won't have the session information of that user, so the user may have to login again. If a server crashes the user info is lost.
- In order to make session storage work at scale you can use a centralized store like Redis for servers to look up user information. That solves consistency but introduces latency and the overhead of keeping the persistence service fault tolerant.
- For every
- Stateless
- Since there are many limitations with the session-based approach, one option is to move to a completely
statelessarchitecture where the server doesn't care who is logging in beyond validating the token. - All the information about the user is embedded in the token itself and the server just verifies the signature.
- JWT wins here.
- Since there are many limitations with the session-based approach, one option is to move to a completely
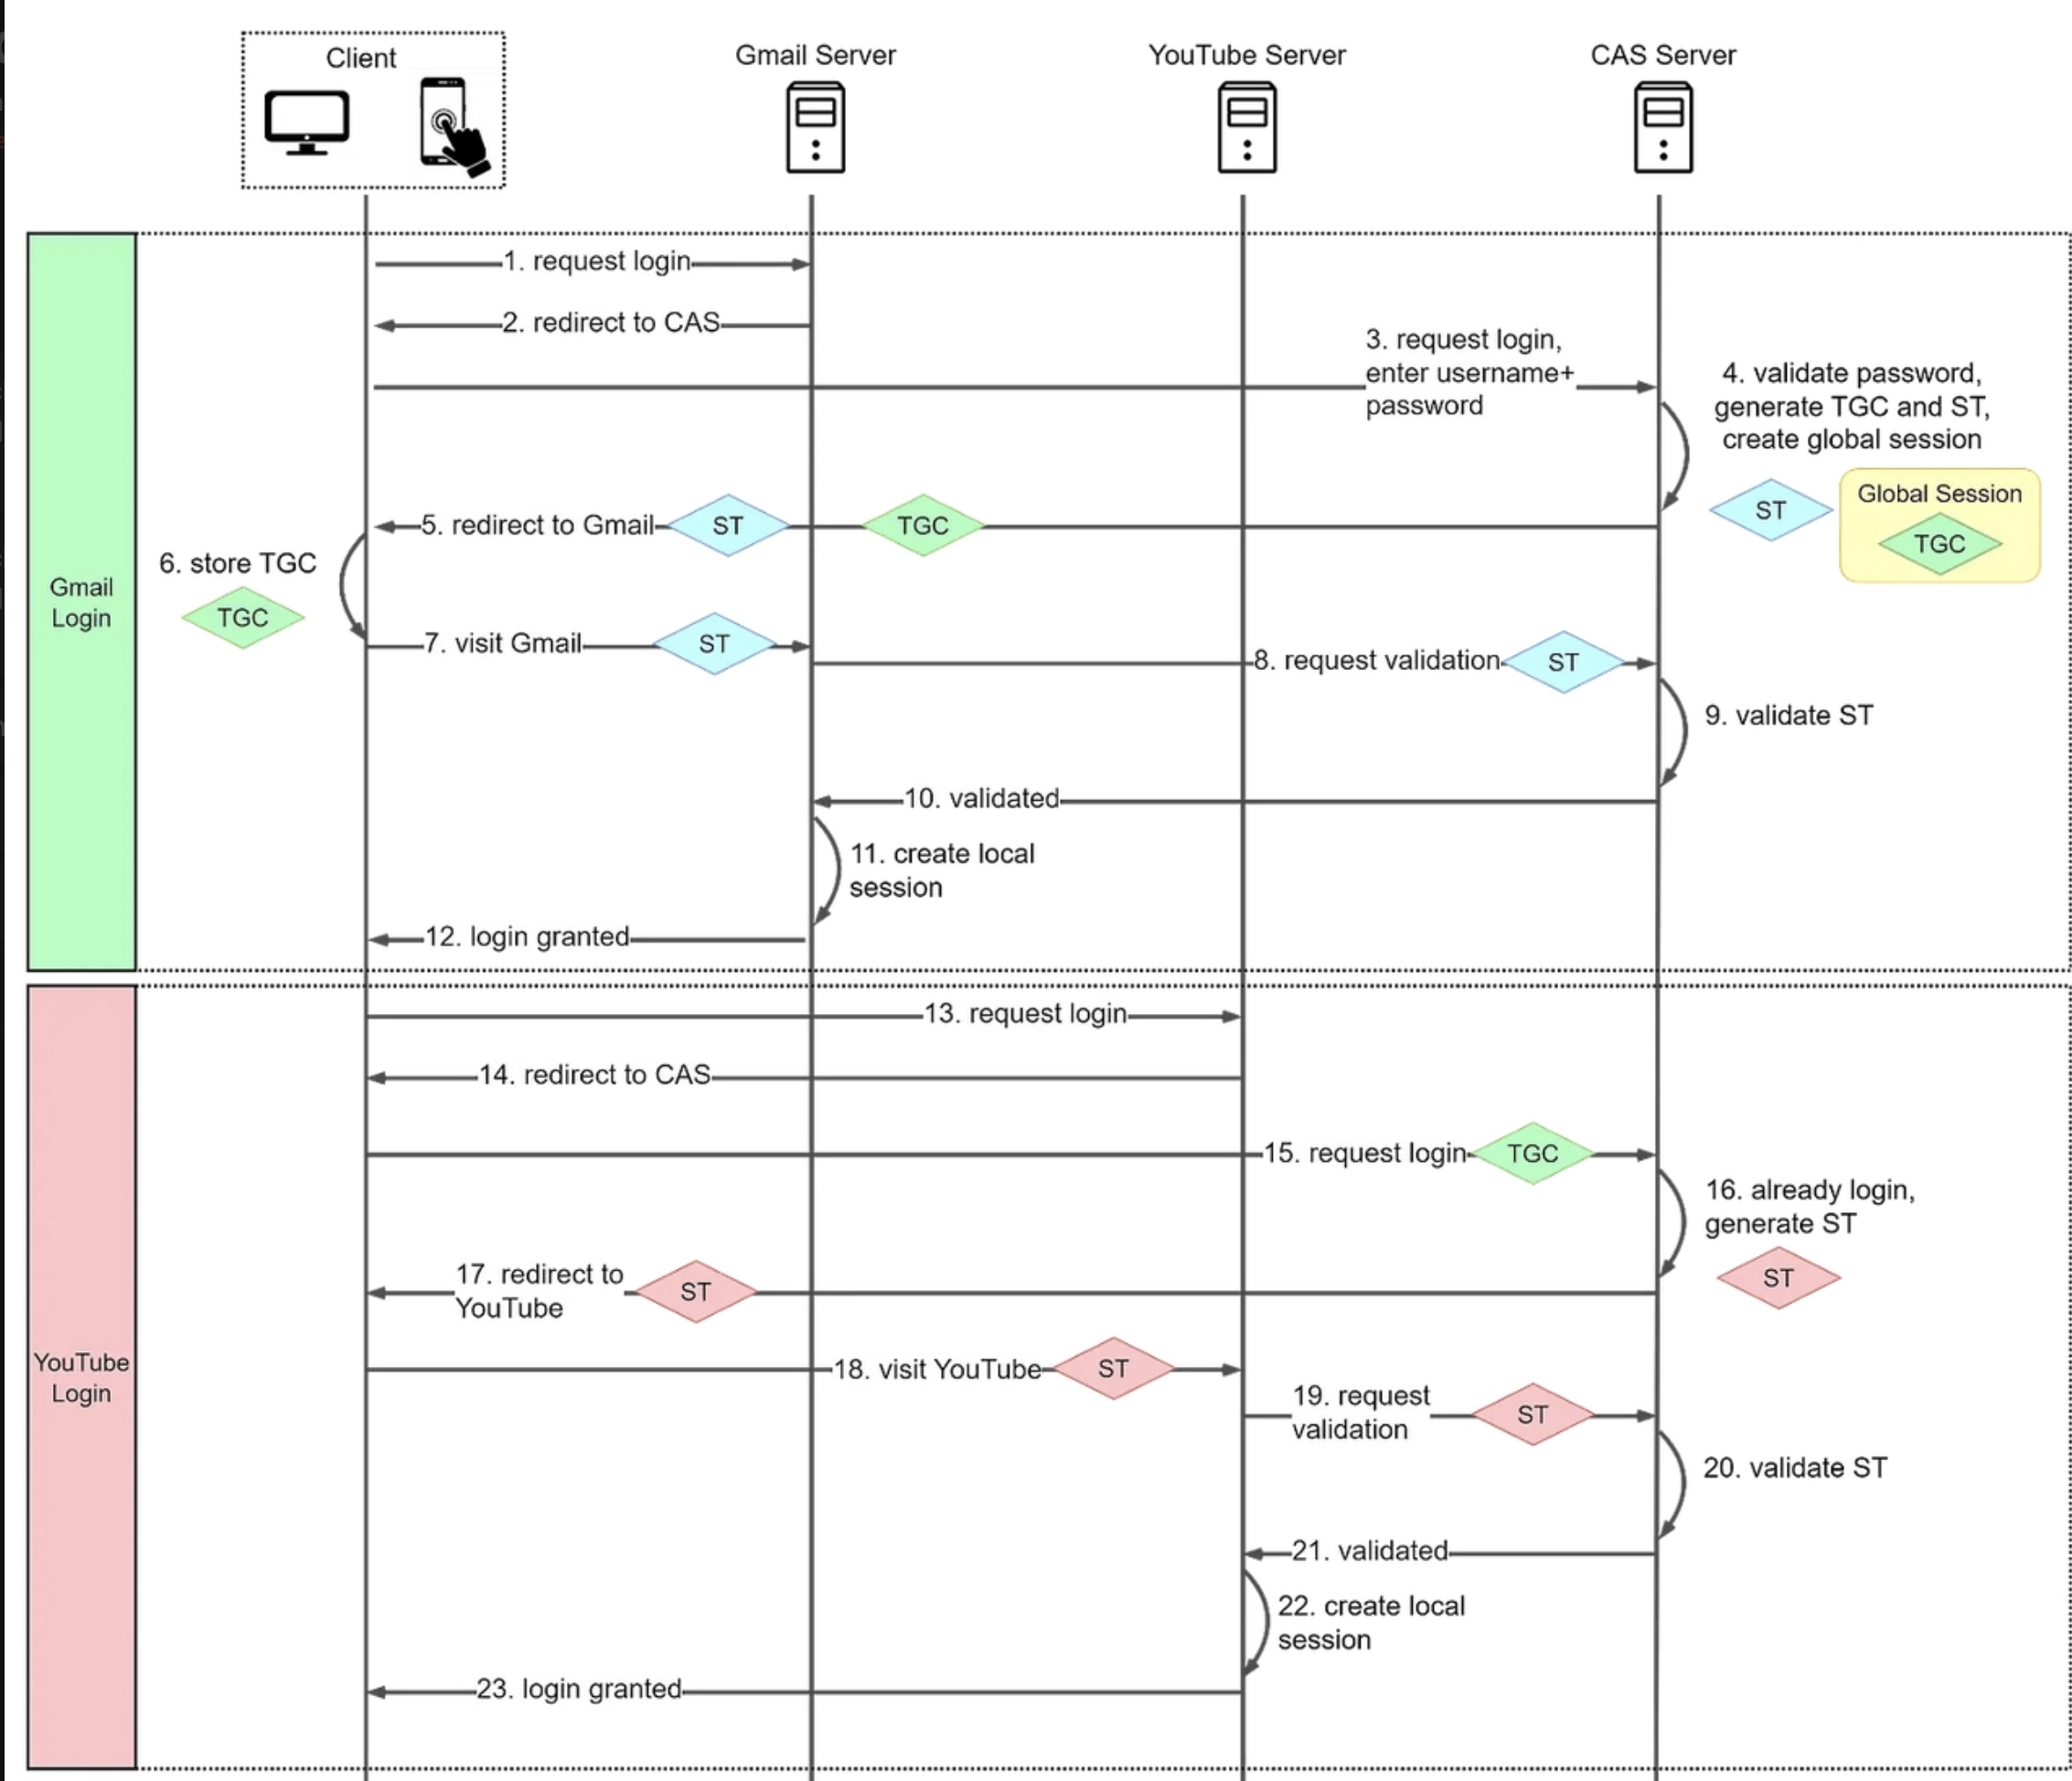
SSO (Single Sign-On)
Consider this problem: you have 5 different applications running on different domains. Each application has its own database, its own authentication, or maybe a central authentication layer, and its own servers.
www.amazon.com        // for shopping
analytics.amazon.com  // for monitoring analytics
sellers.amazon.com // for sellers- A user might have access only to
1, a seller might have access to1and3, and an employee might have access to all 3. - Imagine that employee using all 3 services and having to log in every time on each service. After login that particular application will store a
JWTtoken based on that domain.
This is frustrating because all these services are under a single umbrella. If I log in only once on amazon.com, I should be able to access all 3 services without logging in again.
Solution?
- Let's see some naive implementation ideas.
- Create a
central authentication service. - Every call coming to each service can redirect to a central authentication service. The authentication service creates a
JWTtoken using anRSA asymmetricalgorithm with a private key, and that token is stored in the browser cookie. - Now if that same user visits
analytics.amazon.com, that server can verify it as it has the public key.
Problem:
- Browser cookies are domain scoped.
- If a user visits
amazon.comand a JWT token is created and stored in the browser, that token is stored againstamazon.com. - If that same user visits
analytics.amazon.com, the browser does not automatically send that same token in the naive setup.
So this means we need a common JWT token with a common domain stored in the browser so that every service can redirect incoming requests to that common domain where authentication happens.
SSO [Custom Approach]
- We need 2 things:
- A central authentication service
- A central domain
Common SSO Domain: sso.amazon.com
Applications: amazon.com, analytics.amazon.com, sellers.amazon.com

Flow:
1. User visits amazon.com [SP]
2. amazon.com redirects to sso.amazon.com [IDP]
3. User logs in at sso.amazon.com
4. sso.amazon.com creates session cookie for sso.amazon.com
   4.1 This cookie is now stored in the browser against sso.amazon.com
5. sso.amazon.com redirects back to amazon.com with proof
6. amazon.com creates its own session

Now when user visits analytics.amazon.com:
1. analytics.amazon.com redirects to sso.amazon.com
1.1 If your cookie is stored against *.amazon.com then browser will send that
     cookie directly to analytics.amazon.com, no need for redirection
1.2 sso.amazon.com already has session cookie, retrieved from the browser
1.3 sso.amazon.com immediately redirects back with proof

2. So generally you won't be redirected to sso.amazon.com manually. Your cookie
   will be checked and analytics.amazon.com can validate with sso.amazon.com
   and create a session directly.

3. analytics.amazon.com creates session -> no login required
Central Authentication Service [Identity Provider (IDP)]
// sso.amazon.com - your central authentication service
app.post("/login", (req, res) => {
    // fetch username and password from request
    user = getUser(username, password);

    if (user) {
        // creates a SSO session and generate a JWT token signed with SSO_SECRET
        // payload / claims -> userId, username, expiry
        const ssoSessionKey = createKey(user);

        // set cookie in browser
        res.cookie("sso_session", ssoSession, {
            domain: "sso.amazon.com",
            httpOnly: true,
            secure: true
        });

        // redirect back to requesting app
        const callbackUrl = req.getCallbackDestinationUrl();

        // create another JWT token for the requesting app signalling auth done
        // signed with APP_SECRET_KEY / APP_PUBLIC_KEY
        generateAppToken();
        res.redirect(...);
    }
});

// Check if user already logged in
app.get("/check-auth", (req, res) => {
    const ssoSession = req.cookies.sso_session;
    if (isValidSession(ssoSession)) {
        const user = getUserFromSession(ssoSession);
        const appToken = generateAppToken(user, req.query.app);
        res.json({
            authenticated: true,
            token: appToken,
            user: user
        });
    } else {
        res.json({ authenticated: false });
    }
});
Application Implementation [Service Provider]
// amazon.com - main shopping site
app.get("/login", async (req, res) => {
    // First, check with SSO service
    const ssoCheck = await fetch("https://sso.amazon.com/check-auth?app=analytics", {
        credentials: "include"
    });

    const ssoResult = await ssoCheck.json();
    if (ssoResult.authenticated) {
        // create local JWT session
    } else {
        // Redirect to SSO service
        const ssoUrl = "https://sso.amazon.com/login?return_to=https://amazon.com";
        res.redirect(ssoUrl);
    }
});

// Handle SSO callback
app.get("/auth/callback", (req, res) => {
    const token = req.query.token; // app token

    // Verify token with your public key (APP_PUBLIC_KEY)
    const user = verifyTokenWithPublicKey(token);

    if (user) {
        // Create local session for amazon.com
        const localJWT = createLocalSession(user);
        res.cookie("auth_token", localJWT, {
            domain: "amazon.com",
            httpOnly: true
        });
        res.redirect("/dashboard");
    }
});

// Protected routes check
app.use("/protected", (req, res, next) => {
    const localToken = req.cookies.auth_token; // token for amazon.com
    if (isValidLocalToken(localToken)) {
        next();
    } else {
        // Check with SSO service if still logged in
        res.redirect("/login");
    }
});- So overall here there are 3 tokens generated.
SAML / OIDC
- What we discussed above was a custom SSO approach where we were using our own IDP (identity provider).
- In production we would often like to integrate things like
Login with Google. Those are calledfederated authentication. - Those do not use your own IDP. They use your service provider and an external identity provider.
// OIDC / SAML

External IDP: Google / Microsoft / Okta
App: amazon.com (just this one app)

Flow:
1. Login to amazon.com via "Login with Google"
2. Visit analytics.amazon.com -> NO AUTO LOGIN
   (analytics.amazon.com doesn't know about Google session)
SAML
- Same idea as the JWT token based approach, but instead of creating a separate JWT token for app authorization we pass a
SAMLassertion. - Also we will probably be using an external IDP.
<!-- SAML Assertion (like your JWT but in XML) -->
<saml:Assertion>
    <saml:Subject>
        <saml:NameID>user@company.com</saml:NameID>
    </saml:Subject>
    <saml:AttributeStatement>
        <saml:Attribute Name="email">
            <saml:AttributeValue>user@company.com</saml:AttributeValue>
        </saml:Attribute>
    </saml:AttributeStatement>
</saml:Assertion>
// Flow
1. User accesses amazon.com (Service Provider)
2. amazon.com redirects to company's SAML IdP (like Okta, AD FS)
3. User logs into IdP
4. IdP creates SAML Assertion (XML document with user info)
5. IdP sends user back to amazon.com with SAML Response
6. amazon.com validates SAML assertion and creates sessionOpenID Connect (JSON based)
- Modern standard built on top of
OAuth 2.0
// OIDC ID Token
{
    "sub": "user123",
    "email": "user@company.com",
    "name": "John Doe",
    "iss": "https://sso.company.com",
    "aud": "app.company.com",
    "exp": 1234567890
}

// Access Token - for API calls
// Refresh Token - to get new tokens

// Flow
1. User clicks "Login with Google" on amazon.com
2. amazon.com redirects to Google's authorization server
3. User logs into Google
4. Google redirects back with authorization code
5. amazon.com exchanges code for tokens (access_token + id_token)
6. id_token is a JWT with user info
General Google SSO Flow
Diagram omitted from source export: Google SSO flow.
OAuth 2.0 and OIDC
- OAuth 2.0 is basically an authorization framework. But if used in conjunction with OIDC it can be used for authentication and controlled authorization.
Problem: How do I let a third-party app access my Google Photos
         WITHOUT giving them my Google password?

Solution: OAuth gives the app a "permission token" instead of your password

// That permission token is restricted so that the client cannot do anything on
// your behalf. More like client can view limited stuff.
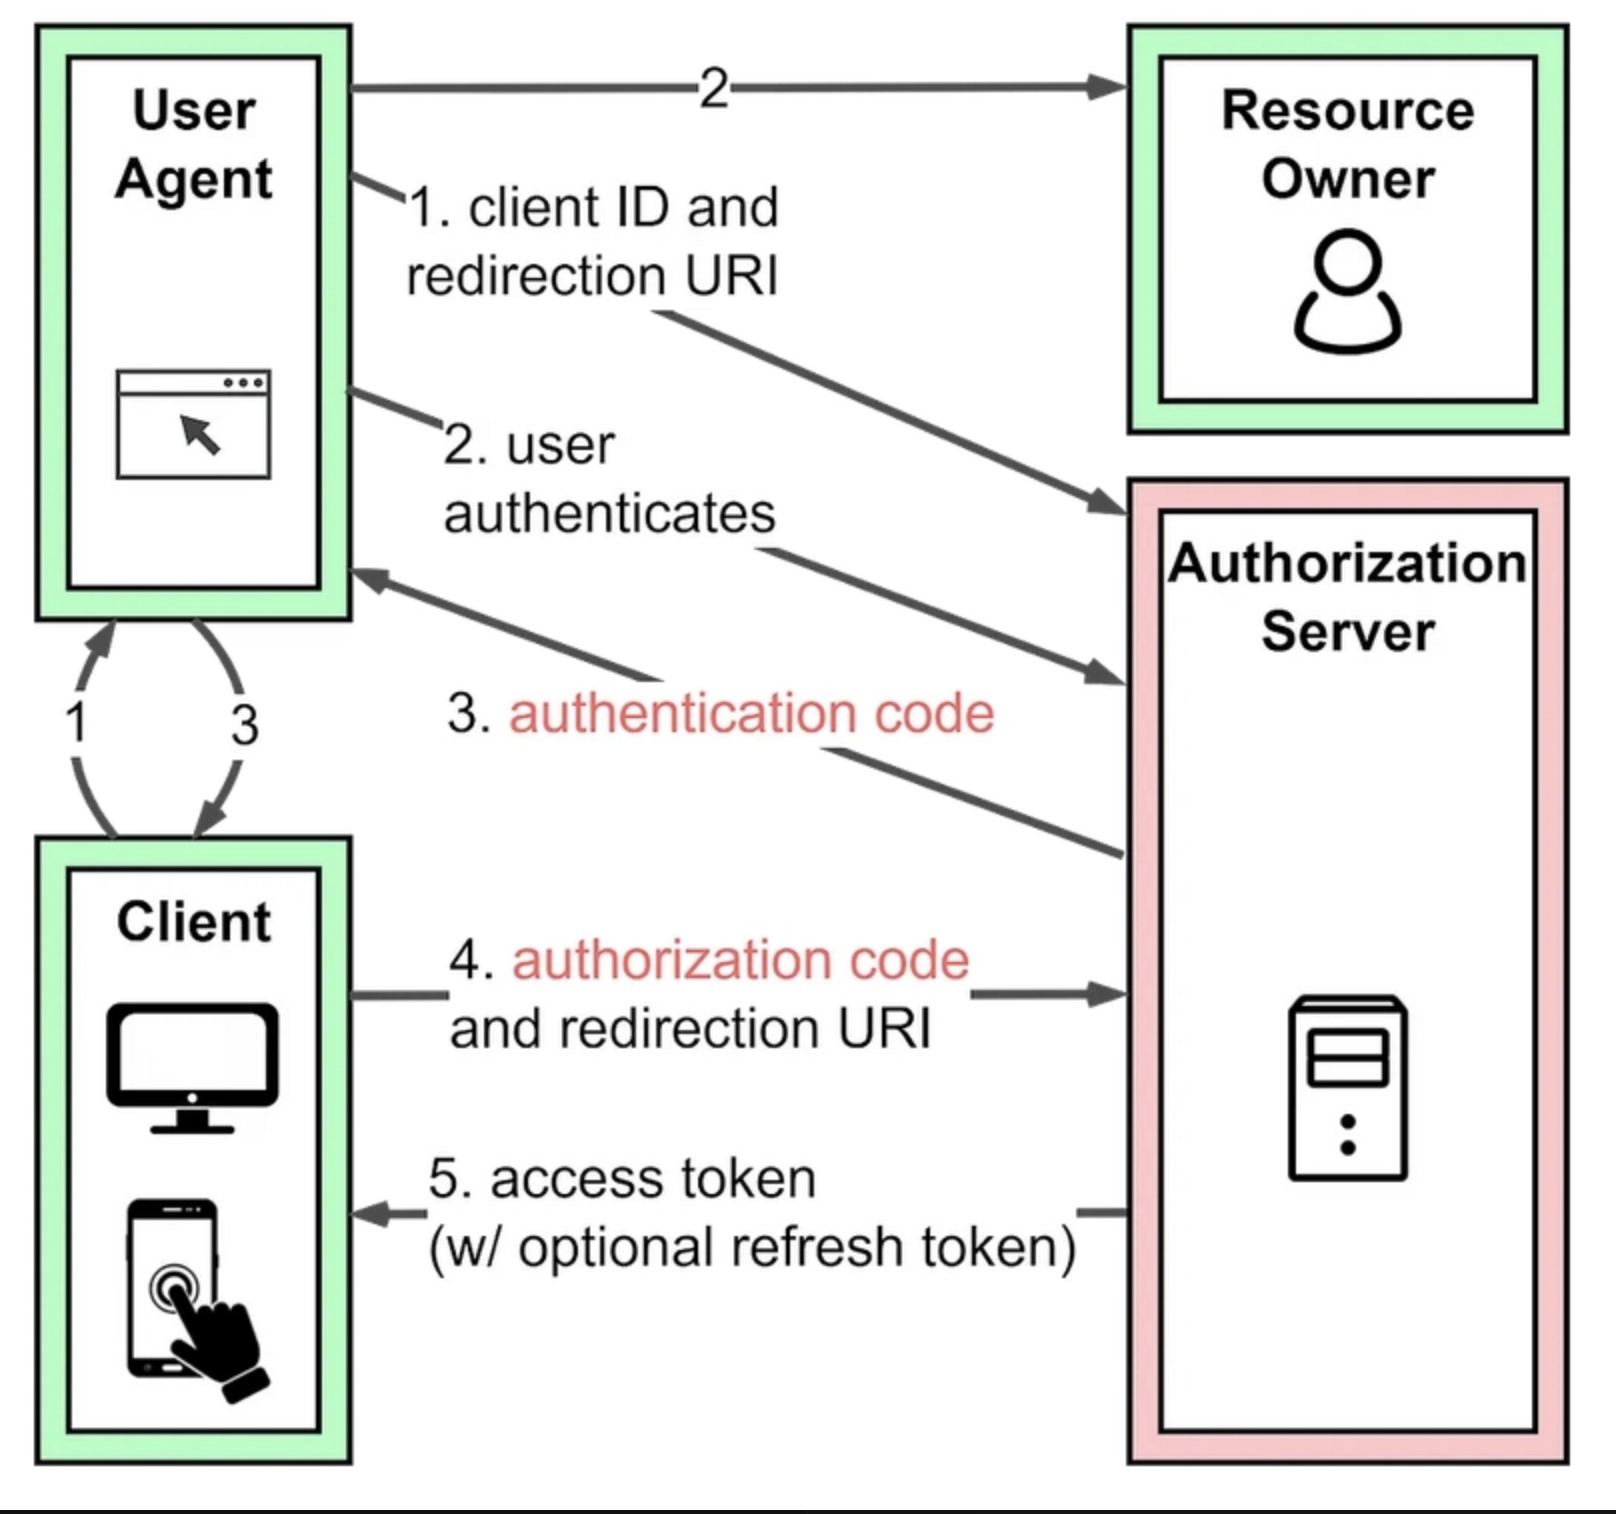
OAuth 2.0 Flow - Actors
1. Resource Owner: You (the user)
2. Client: Canva (the app wanting access)
3. Authorization Server: Google's OAuth server
4. Resource Server: Google Photos API
Flow
In case of Google, access tokens are often opaque tokens and not necessarily JWTs. So Google Photos server may have to call an internal authentication service to validate those access tokens.
1. User visits Canva and clicks on Connect Google Photos

-- Canva Server --
2. Canva creates an OAuth URL with its clientId="canva-client-id" and a
   redirect URL. Once authentication is successful Google's OAuth server
   redirects to that URL.
   -> Now Canva redirects the user to that URL prompting login with Google.

3. User logs in with Google using email and password.

--- Google OAuth Server --
3. Google OAuth server verifies the client ID and user information and checks if
   user exists. If the user exists, Google creates an authorization code
   along with requested scope and stores it in the database.
   -> Google server then callbacks on the redirect URL with the auth code.

----- Canva Server ----
4. Canva server receives the callback and now exchanges the auth code
   for access tokens. It calls Google OAuth server with clientId and secret.

4.1 When Google receives token exchange request from client app it first
    validates the clientId and secret, looks up the auth code in database,
    pulls the data, checks requested scope, and creates a JWT-like token
    with requested scope, clientId, and expiry. It then signs this access token
    with GOOGLE_PRIVATE_KEY and sends it back.

4.2 Canva receives the access tokens and refresh tokens. Canva stores these
    tokens for subsequent requests.

5. Now user can access Google Photos inside Canva with that access token.
Diagram omitted from source export: OAuth authorization code flow.
Implementation [OIDC and OAuth]
// Step 1: Canva redirects you to Google
app.get("/connect-google-photos", (req, res) => {
    const authUrl = "https://accounts.google.com/oauth/authorize?" +
        "client_id=your_client_id&" +
        "redirect_uri=https://yourapp.com/auth/google/callback&" +
        "scope=openid profile email&" +
        "response_type=code&" +
        "state=random_security_string";

    res.redirect(authUrl);
});

// Step 2: Google shows consent screen
// "Canva wants to access your Google Photos. Allow?"
// User clicks "Allow"

// Step 3: Google redirects back to Canva with authorization code
app.get("/oauth/callback", async (req, res) => {
    const authCode = req.query.code;
    const state = req.query.state;

    // Step 4: Exchange authorization code for access token
    const tokenResponse = await fetch("https://oauth2.googleapis.com/token", {
        method: "POST",
        headers: { "Content-Type": "application/x-www-form-urlencoded" },
        body: new URLSearchParams({
            client_id: "canva_client_id",
            client_secret: "canva_client_secret",
            code: authCode,
            grant_type: "authorization_code",
            redirect_uri: "https://canva.com/oauth/callback"
        })
    });

    const tokens = await tokenResponse.json();
    /*
    Response:
    {
        "access_token": "ya29.a0ARrd...",
        "refresh_token": "1//04...",
        "id_token": "eyJhbGciOiJSUzI1NiIs...",
        "expires_in": 3600,
        "scope": "photos.readonly",
        "token_type": "Bearer"
    }
    */

    // Step 4.1: Verify and decode ID token
    const idToken = tokens.id_token;
    const userInfo = jwt.verify(idToken, GOOGLE_PUBLIC_KEY);

    // Step 5: Store tokens and use them to access Google Photos
    await storeUserTokens(req.user.id, tokens);

    res.redirect("/dashboard?connected=google-photos");
});

// Step 6: Use access token to fetch photos
app.get("/api/photos", async (req, res) => {
    const tokens = await getUserTokens(req.user.id);

    const photosResponse = await fetch("https://photoslibrary.googleapis.com/v1/mediaItems", {
        headers: {
            "Authorization": `Bearer ${tokens.access_token}`
        }
    });

    const photos = await photosResponse.json();
    res.json(photos);
});
OIDC with OAuth
const oauthUseCases = [
    "Canva accessing Google Photos",
    "Zapier connecting to your Gmail",
    "Mobile app accessing Twitter API",
    "CI/CD tool deploying to AWS",
    "Analytics tool reading Google Analytics"
];

const oidcUseCases = [
    "Login with Google",
    "Login with Microsoft",
    "Login with GitHub",
    "Enterprise SSO",
    "Social login buttons"
];
The beautiful thing about OIDC is that it also solves your login / identity problem on top of OAuth authorization flows.
Engineering Blogs
- Grab integration of single source authentication for multiple services using DEX